前言
这个系列的前两节分别分析了 View 和 ViewGroup 中的事件分发,Android 中的事件分发还涉及到 Activity。但是内容过于简单,就不详细分析了,本节我们学习下 View 的 scrollTo、scrollBy 以及滑动辅助 Scroller。
Demo
正文开始之前我们先看一个 Demo。
public class MainActivity extends AppCompatActivity {

    static final String TAG = "ScrollDemo";

    @Override
    protected void onCreate(Bundle savedInstanceState) {
        super.onCreate(savedInstanceState);
        setContentView(R.layout.activity_main);

        final TextView textView = findViewById(R.id.text);
        final LinearLayout linearLayout = findViewById(R.id.line1);

        findViewById(R.id.btn_scroll_to).setOnClickListener(new View.OnClickListener() {
            @Override
            public void onClick(View v) {
                linearLayout.scrollTo(-200,-200);
            }
        });

         findViewById(R.id.btn_scroll_by).setOnClickListener(new View.OnClickListener() {
            @Override
            public void onClick(View v) {
                linearLayout.scrollBy(-50,-50);
            }
        });

    }
}
<?xml version="1.0" encoding="utf-8"?>
<LinearLayout xmlns:android="http://schemas.android.com/apk/res/android"
    android:layout_width="match_parent"
    android:layout_height="match_parent"
    android:orientation="vertical">

    <Button
        android:id="@+id/btn_scroll_to"
        android:layout_width="match_parent"
        android:layout_height="wrap_content"
        android:text="Scroll to" />

    <Button
        android:id="@+id/btn_scroll_by"
        android:layout_width="match_parent"
        android:layout_height="wrap_content"
        android:text="Scroll by" />

    <LinearLayout
        android:id="@+id/line1"
        android:layout_width="match_parent"
        android:layout_height="match_parent"
        android:background="#ff0000">

        <TextView
            android:id="@+id/text"
            android:layout_width="match_parent"
            android:layout_height="200dp"
            android:background="#00ff00"
            android:gravity="center"
            android:text="不要玩我" />
    </LinearLayout>

</LinearLayout>
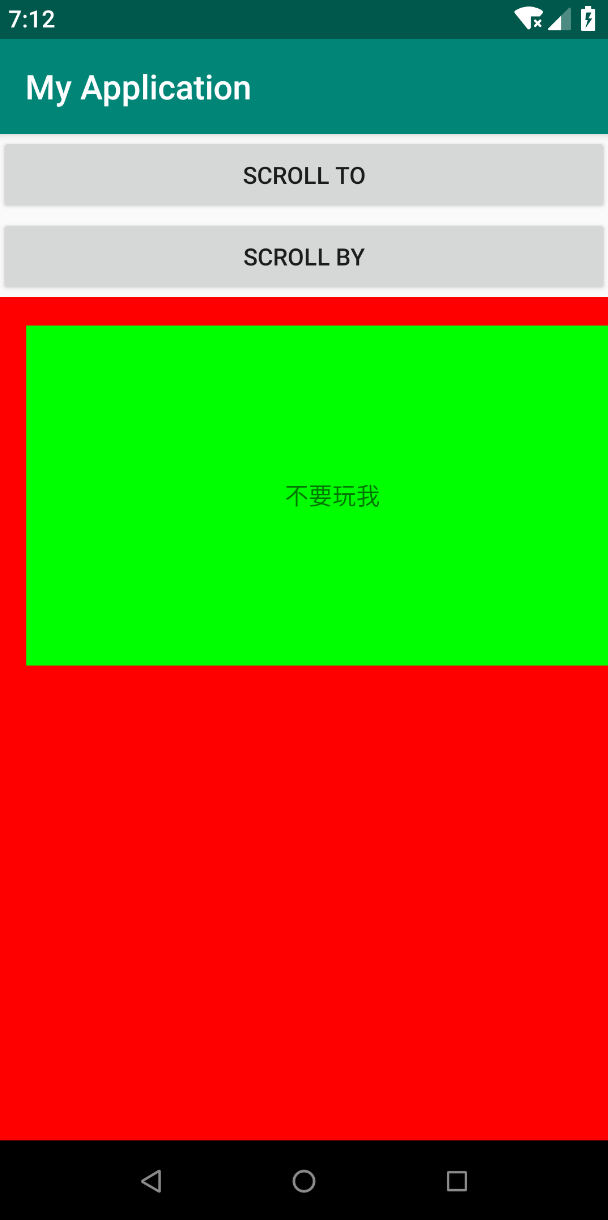
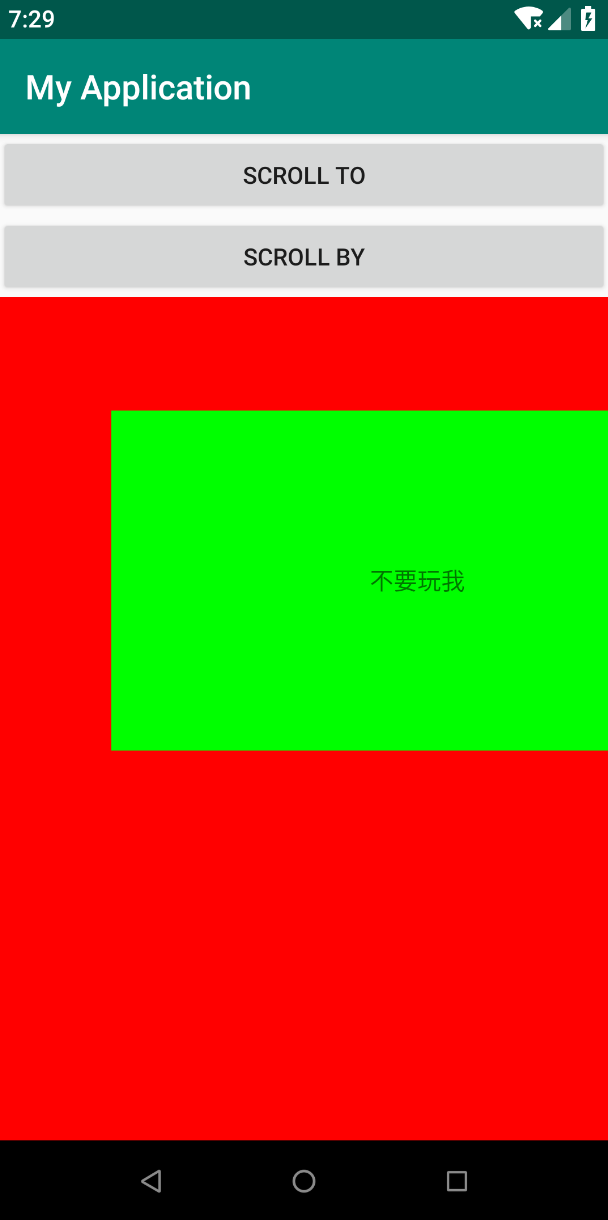
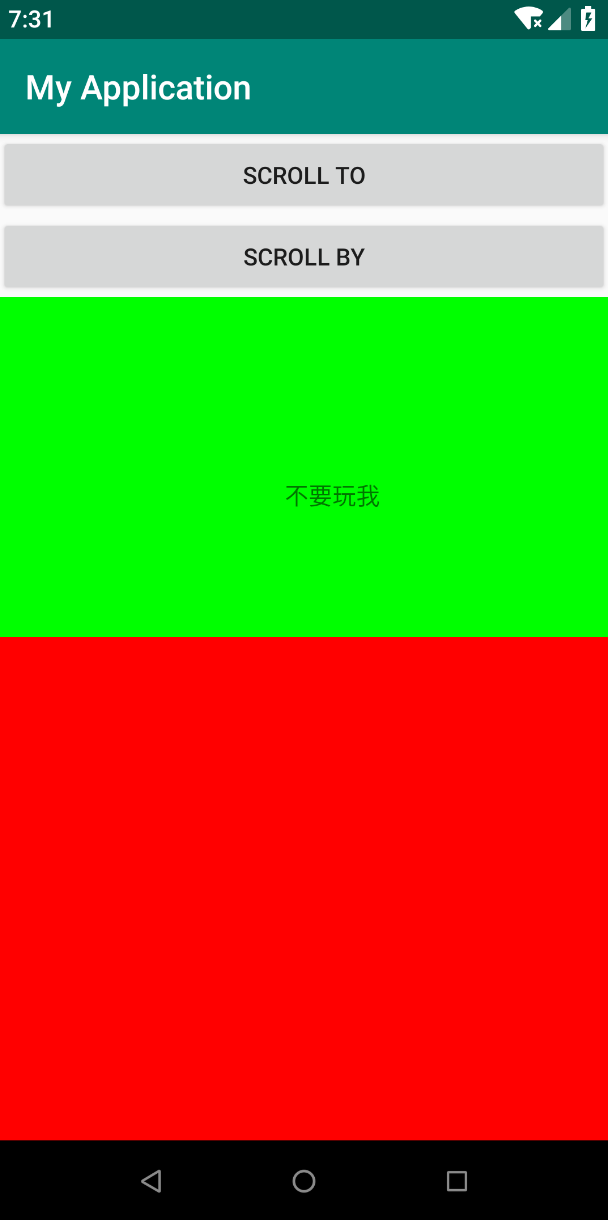
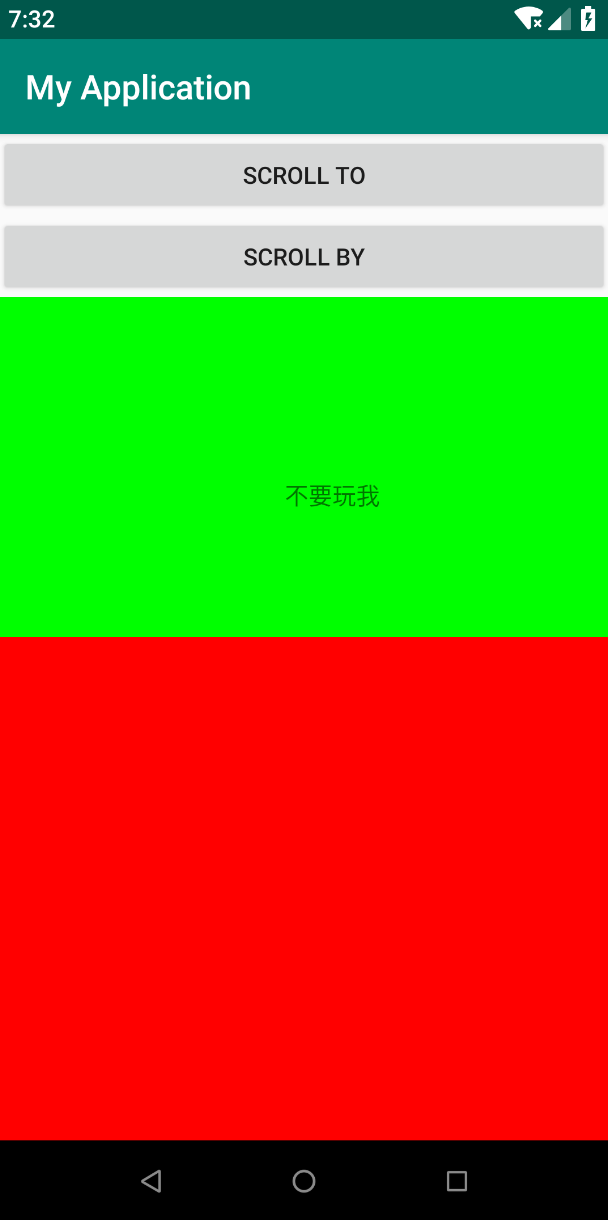
很简单,页面中有两个按钮,一个 LinearLayout 和一个 TextView,点击按钮对 LinearLayout 进行 Scroll 操作,结果如下:
scrollTo

scrollBy
scrollTo 之后 scrollBy

scrollBy n 次之后 scrollTo
然后修改代码,将事件作用到 TextView,再看下效果。
  findViewById(R.id.btn_scroll_to).setOnClickListener(new View.OnClickListener() {
            @Override
            public void onClick(View v) {
                textView.scrollTo(-200,-200);
            }
        });

         findViewById(R.id.btn_scroll_by).setOnClickListener(new View.OnClickListener() {
            @Override
            public void onClick(View v) {
                textView.scrollBy(-50,-50);
            }
        });
scrollTo
scrollBy
scrollTo 之后 scrollBy

scrollBy n 次之后 scrollTo

其中可以看到 scrollTo 是根据绝对位置进行位移,也就是说不论 View 当前处于哪个位置,它的新坐标都是根据原点坐标计算出来的。 scrollBy 是根据相对位置进行移动,也就是根据现在 View 的坐标在进行一定距离的移动。
看了上面的 Demo,有两点比较奇怪:
- scrollTo 和 scrollBy 的参数都是填的负值,但是都是向右下移动,这和 Android 坐标系中左上是坐标原点不符。
- LinearLayout scroll 的时候,它的子 View TextView 发生了位移。TextView scroll 的时候,它自己的位置没有动,其中的内容发生了位移。
带着上面我们观察到的效果和疑问,我们看一下官方文档和源码:
官方文档
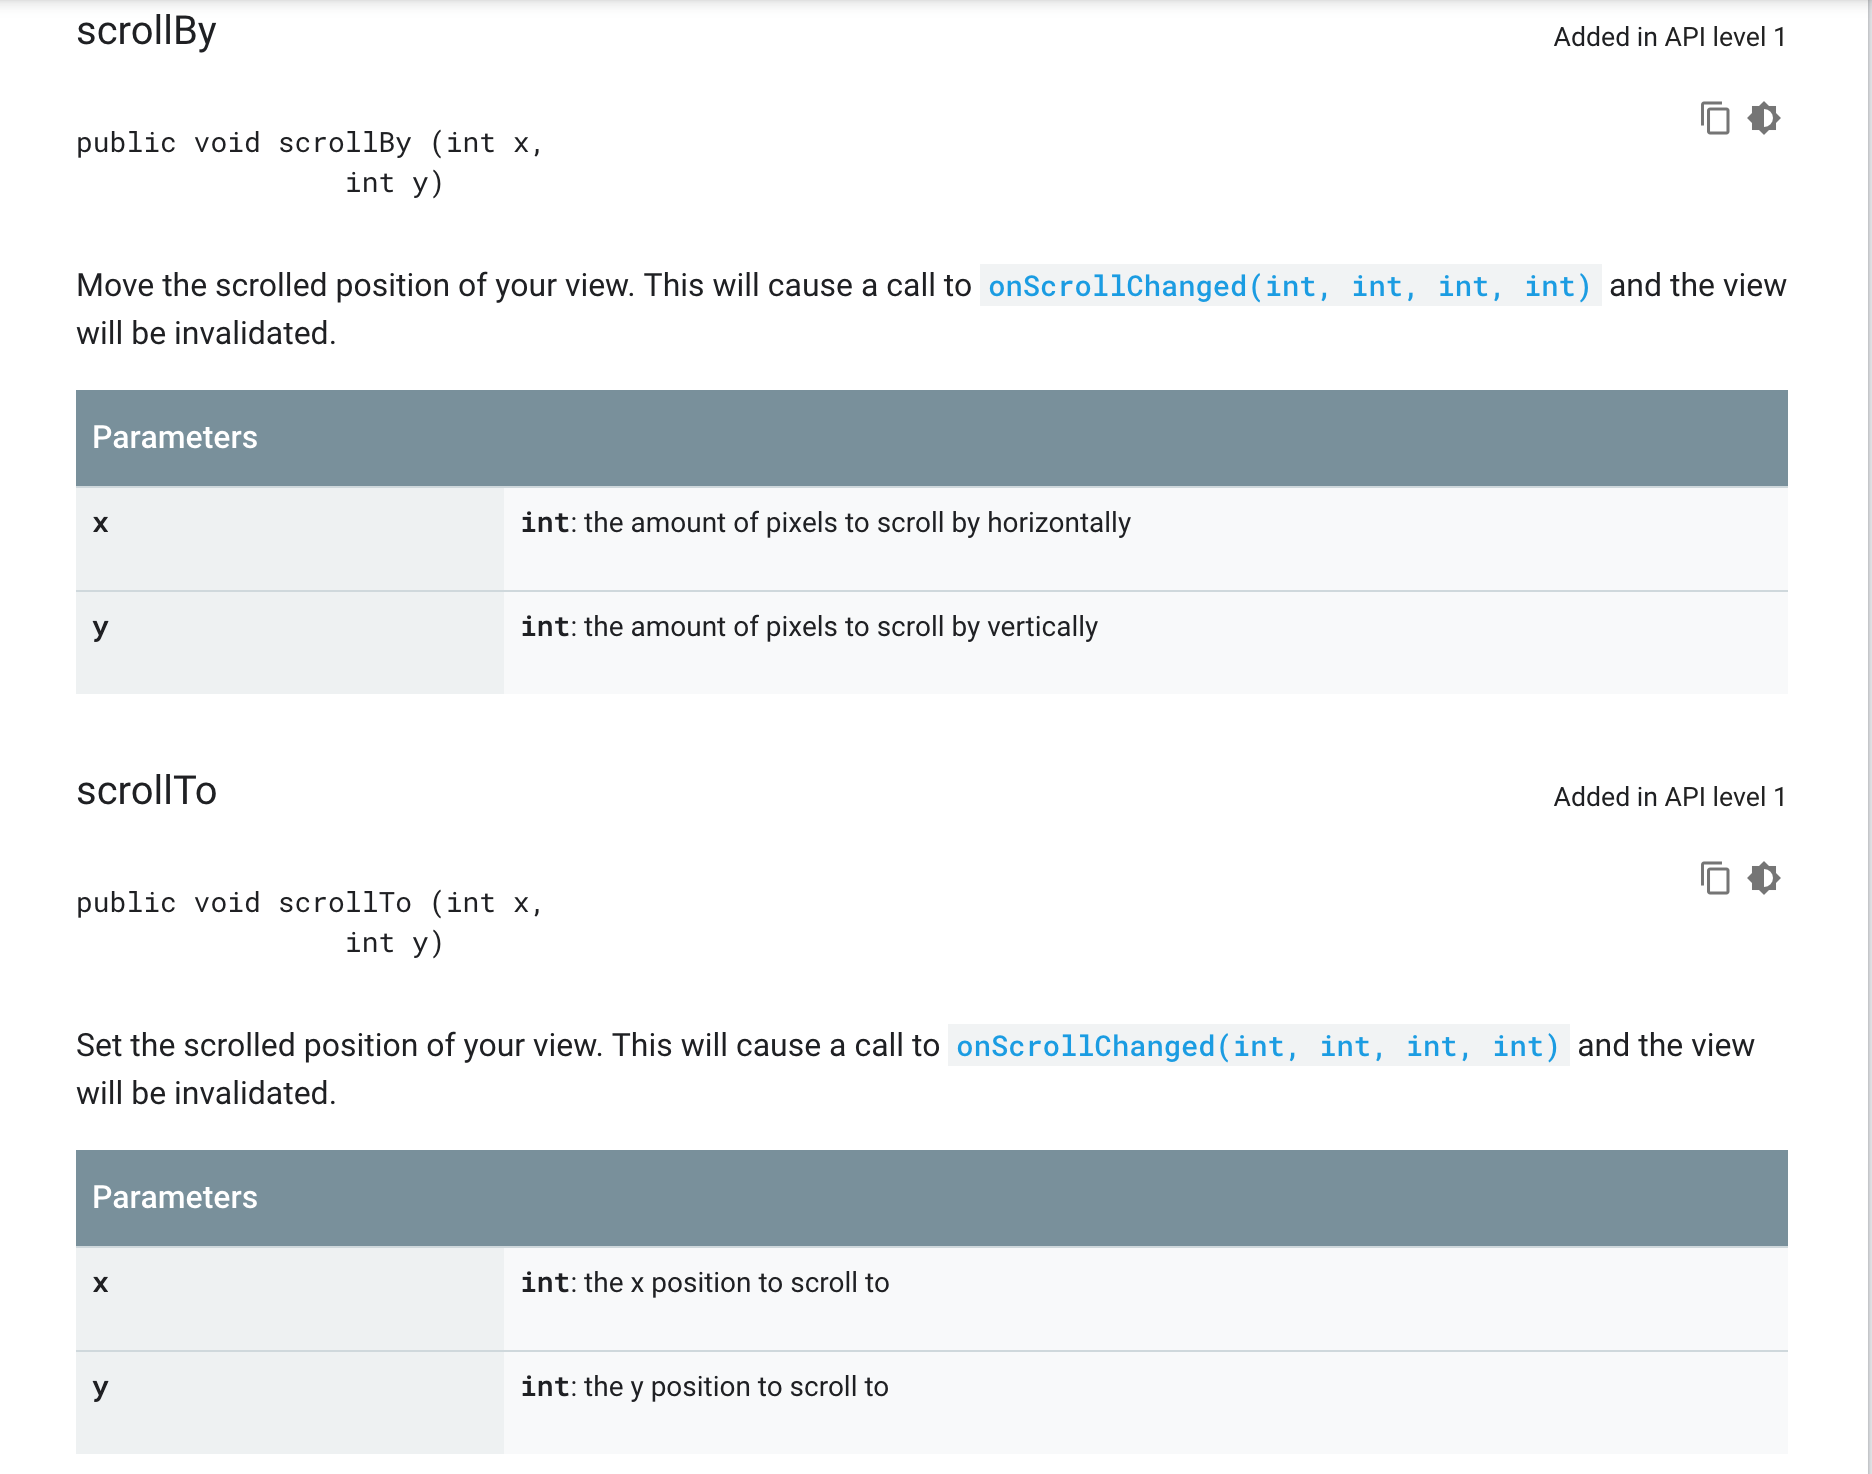
注意官方文档的用此非常精妙 Set 和 Move。Set 就是给 View 设定一个位置而 Move 相当于移动一定距离。
源码
View#scrollBy
 public void scrollBy(int x, int y) {
        scrollTo(mScrollX + x, mScrollY + y);
    }
View#scrollTo
public void scrollTo(int x, int y) {
        if (mScrollX != x || mScrollY != y) {
            int oldX = mScrollX;
            int oldY = mScrollY;
            mScrollX = x;
            mScrollY = y;
            invalidateParentCaches();
            onScrollChanged(mScrollX, mScrollY, oldX, oldY);
            if (!awakenScrollBars()) {
                postInvalidateOnAnimation();
            }
        }
    }
可以看到 scrollBy 也是调用 scrollTo 实现,下面我们重点分析 scrollTo。
其中有两个很重要的参数 mScrollX 和 mScrollY:
    /**
     * The offset, in pixels, by which the content of this view is scrolled
     * horizontally.
     * {@hide}
     */
    @ViewDebug.ExportedProperty(category = "scrolling")
    protected int mScrollX;
    /**
     * The offset, in pixels, by which the content of this view is scrolled
     * vertically.
     * {@hide}
     */
    @ViewDebug.ExportedProperty(category = "scrolling")
    protected int mScrollY;

      /**
     * Set the horizontal scrolled position of your view. This will cause a call to
     * {@link #onScrollChanged(int, int, int, int)} and the view will be
     * invalidated.
     * @param value the x position to scroll to
     */
    public void setScrollX(int value) {
        scrollTo(value, mScrollY);
    }

    /**
     * Set the vertical scrolled position of your view. This will cause a call to
     * {@link #onScrollChanged(int, int, int, int)} and the view will be
     * invalidated.
     * @param value the y position to scroll to
     */
    public void setScrollY(int value) {
        scrollTo(mScrollX, value);
    }
可以看到注释中有这样一段话:
The offset, in pixels, by which the content of this view is scrolled
这句话解释了当我们使用 scrollTo 或 scrollBy 的时候为什么移动的不是控件本身而是控件中的内容。
接着 scrollTo 往下看,scrollTo 中调用了这个方法 postInvalidateOnAnimation
View#postInvalidateOnAnimation
    /**
     * <p>Cause an invalidate to happen on the next animation time step, typically the
     * next display frame.</p>
     *
     * <p>This method can be invoked from outside of the UI thread
     * only when this View is attached to a window.</p>
     *
     * @see #invalidate()
     */
    public void postInvalidateOnAnimation() {
        // We try only with the AttachInfo because there's no point in invalidating
        // if we are not attached to our window
        final AttachInfo attachInfo = mAttachInfo;
        if (attachInfo != null) {
            attachInfo.mViewRootImpl.dispatchInvalidateOnAnimation(this);
        }
    }
ViewRootImpl#dispatchInvalidateOnAnimation
    public void dispatchInvalidateOnAnimation(View view) {
        mInvalidateOnAnimationRunnable.addView(view);
    }
InvalidateOnAnimationRunnable
final class InvalidateOnAnimationRunnable implements Runnable {
        private boolean mPosted;
        private final ArrayList<View> mViews = new ArrayList<View>();
        private final ArrayList<AttachInfo.InvalidateInfo> mViewRects =
                new ArrayList<AttachInfo.InvalidateInfo>();
        private View[] mTempViews;
        private AttachInfo.InvalidateInfo[] mTempViewRects;

        public void addView(View view) {
            synchronized (this) {
                mViews.add(view);
                postIfNeededLocked();
            }
        }

        public void addViewRect(AttachInfo.InvalidateInfo info) {
            synchronized (this) {
                mViewRects.add(info);
                postIfNeededLocked();
            }
        }

        public void removeView(View view) {
            synchronized (this) {
                mViews.remove(view);

                for (int i = mViewRects.size(); i-- > 0; ) {
                    AttachInfo.InvalidateInfo info = mViewRects.get(i);
                    if (info.target == view) {
                        mViewRects.remove(i);
                        info.recycle();
                    }
                }

                if (mPosted && mViews.isEmpty() && mViewRects.isEmpty()) {
                    mChoreographer.removeCallbacks(Choreographer.CALLBACK_ANIMATION, this, null);
                    mPosted = false;
                }
            }
        }

        @Override
        public void run() {
            final int viewCount;
            final int viewRectCount;
            synchronized (this) {
                mPosted = false;

                viewCount = mViews.size();
                if (viewCount != 0) {
                    mTempViews = mViews.toArray(mTempViews != null
                            ? mTempViews : new View[viewCount]);
                    mViews.clear();
                }

                viewRectCount = mViewRects.size();
                if (viewRectCount != 0) {
                    mTempViewRects = mViewRects.toArray(mTempViewRects != null
                            ? mTempViewRects : new AttachInfo.InvalidateInfo[viewRectCount]);
                    mViewRects.clear();
                }
            }

            for (int i = 0; i < viewCount; i++) {
                mTempViews[i].invalidate();
                mTempViews[i] = null;
            }

            for (int i = 0; i < viewRectCount; i++) {
                final View.AttachInfo.InvalidateInfo info = mTempViewRects[i];
                info.target.invalidate(info.left, info.top, info.right, info.bottom);
                info.recycle();
            }
        }

        private void postIfNeededLocked() {
            if (!mPosted) {
                mChoreographer.postCallback(Choreographer.CALLBACK_ANIMATION, this, null);
                mPosted = true;
            }
        }
    }
这是一个 Runnable 对象,run() 方法中有这么一段:
for (int i = 0; i < viewCount; i++) {
                mTempViews[i].invalidate();
                mTempViews[i] = null;
            }
遍历所有 View 调用它的 invalidate()。
  /**
     * Invalidate the whole view. If the view is visible,
     * {@link #onDraw(android.graphics.Canvas)} will be called at some point in
     * the future.
     * <p>
     * This must be called from a UI thread. To call from a non-UI thread, call
     * {@link #postInvalidate()}.
     */
    public void invalidate() {
        invalidate(true);
    }
  /**
     * This is where the invalidate() work actually happens. A full invalidate()
     * causes the drawing cache to be invalidated, but this function can be
     * called with invalidateCache set to false to skip that invalidation step
     * for cases that do not need it (for example, a component that remains at
     * the same dimensions with the same content).
     *
     * @param invalidateCache Whether the drawing cache for this view should be
     *            invalidated as well. This is usually true for a full
     *            invalidate, but may be set to false if the View's contents or
     *            dimensions have not changed.
     * @hide
     */
    public void invalidate(boolean invalidateCache) {
        invalidateInternal(0, 0, mRight - mLeft, mBottom - mTop, invalidateCache, true);
    }
    void invalidateInternal(int l, int t, int r, int b, boolean invalidateCache,
            boolean fullInvalidate) {
        if (mGhostView != null) {
            mGhostView.invalidate(true);
            return;
        }

        if (skipInvalidate()) {
            return;
        }

        if ((mPrivateFlags & (PFLAG_DRAWN | PFLAG_HAS_BOUNDS)) == (PFLAG_DRAWN | PFLAG_HAS_BOUNDS)
                || (invalidateCache && (mPrivateFlags & PFLAG_DRAWING_CACHE_VALID) == PFLAG_DRAWING_CACHE_VALID)
                || (mPrivateFlags & PFLAG_INVALIDATED) != PFLAG_INVALIDATED
                || (fullInvalidate && isOpaque() != mLastIsOpaque)) {
            if (fullInvalidate) {
                mLastIsOpaque = isOpaque();
                mPrivateFlags &= ~PFLAG_DRAWN;
            }

            mPrivateFlags |= PFLAG_DIRTY;

            if (invalidateCache) {
                mPrivateFlags |= PFLAG_INVALIDATED;
                mPrivateFlags &= ~PFLAG_DRAWING_CACHE_VALID;
            }

            // Propagate the damage rectangle to the parent view.
            final AttachInfo ai = mAttachInfo;
            final ViewParent p = mParent;
            if (p != null && ai != null && l < r && t < b) {
                final Rect damage = ai.mTmpInvalRect;
                damage.set(l, t, r, b);
                p.invalidateChild(this, damage);
            }

            // Damage the entire projection receiver, if necessary.
            if (mBackground != null && mBackground.isProjected()) {
                final View receiver = getProjectionReceiver();
                if (receiver != null) {
                    receiver.damageInParent();
                }
            }
        }
    }
注意到有
 if (p != null && ai != null && l < r && t < b) {
                final Rect damage = ai.mTmpInvalRect;
                damage.set(l, t, r, b);
                p.invalidateChild(this, damage);
            }
这段再次说明了,scrollTo 只能作用于 View 的内容而不是 View 本身。再接着看:
  /**
     * Don't call or override this method. It is used for the implementation of
     * the view hierarchy.
     *
     * @deprecated Use {@link #onDescendantInvalidated(View, View)} instead to observe updates to
     * draw state in descendants.
     */
    @Deprecated
    @Override
    public final void invalidateChild(View child, final Rect dirty) {
        final AttachInfo attachInfo = mAttachInfo;
        if (attachInfo != null && attachInfo.mHardwareAccelerated) {
            // HW accelerated fast path
            onDescendantInvalidated(child, child);
            return;
        }

        ViewParent parent = this;
        if (attachInfo != null) {
            // If the child is drawing an animation, we want to copy this flag onto
            // ourselves and the parent to make sure the invalidate request goes
            // through
            final boolean drawAnimation = (child.mPrivateFlags & PFLAG_DRAW_ANIMATION) != 0;

            // Check whether the child that requests the invalidate is fully opaque
            // Views being animated or transformed are not considered opaque because we may
            // be invalidating their old position and need the parent to paint behind them.
            Matrix childMatrix = child.getMatrix();
            final boolean isOpaque = child.isOpaque() && !drawAnimation &&
                    child.getAnimation() == null && childMatrix.isIdentity();
            // Mark the child as dirty, using the appropriate flag
            // Make sure we do not set both flags at the same time
            int opaqueFlag = isOpaque ? PFLAG_DIRTY_OPAQUE : PFLAG_DIRTY;

            if (child.mLayerType != LAYER_TYPE_NONE) {
                mPrivateFlags |= PFLAG_INVALIDATED;
                mPrivateFlags &= ~PFLAG_DRAWING_CACHE_VALID;
            }

            final int[] location = attachInfo.mInvalidateChildLocation;
            location[CHILD_LEFT_INDEX] = child.mLeft;
            location[CHILD_TOP_INDEX] = child.mTop;
            if (!childMatrix.isIdentity() ||
                    (mGroupFlags & ViewGroup.FLAG_SUPPORT_STATIC_TRANSFORMATIONS) != 0) {
                RectF boundingRect = attachInfo.mTmpTransformRect;
                boundingRect.set(dirty);
                Matrix transformMatrix;
                if ((mGroupFlags & ViewGroup.FLAG_SUPPORT_STATIC_TRANSFORMATIONS) != 0) {
                    Transformation t = attachInfo.mTmpTransformation;
                    boolean transformed = getChildStaticTransformation(child, t);
                    if (transformed) {
                        transformMatrix = attachInfo.mTmpMatrix;
                        transformMatrix.set(t.getMatrix());
                        if (!childMatrix.isIdentity()) {
                            transformMatrix.preConcat(childMatrix);
                        }
                    } else {
                        transformMatrix = childMatrix;
                    }
                } else {
                    transformMatrix = childMatrix;
                }
                transformMatrix.mapRect(boundingRect);
                dirty.set((int) Math.floor(boundingRect.left),
                        (int) Math.floor(boundingRect.top),
                        (int) Math.ceil(boundingRect.right),
                        (int) Math.ceil(boundingRect.bottom));
            }

            do {
                View view = null;
                if (parent instanceof View) {
                    view = (View) parent;
                }

                if (drawAnimation) {
                    if (view != null) {
                        view.mPrivateFlags |= PFLAG_DRAW_ANIMATION;
                    } else if (parent instanceof ViewRootImpl) {
                        ((ViewRootImpl) parent).mIsAnimating = true;
                    }
                }

                // If the parent is dirty opaque or not dirty, mark it dirty with the opaque
                // flag coming from the child that initiated the invalidate
                if (view != null) {
                    if ((view.mViewFlags & FADING_EDGE_MASK) != 0 &&
                            view.getSolidColor() == 0) {
                        opaqueFlag = PFLAG_DIRTY;
                    }
                    if ((view.mPrivateFlags & PFLAG_DIRTY_MASK) != PFLAG_DIRTY) {
                        view.mPrivateFlags = (view.mPrivateFlags & ~PFLAG_DIRTY_MASK) | opaqueFlag;
                    }
                }

                parent = parent.invalidateChildInParent(location, dirty);
                if (view != null) {
                    // Account for transform on current parent
                    Matrix m = view.getMatrix();
                    if (!m.isIdentity()) {
                        RectF boundingRect = attachInfo.mTmpTransformRect;
                        boundingRect.set(dirty);
                        m.mapRect(boundingRect);
                        dirty.set((int) Math.floor(boundingRect.left),
                                (int) Math.floor(boundingRect.top),
                                (int) Math.ceil(boundingRect.right),
                                (int) Math.ceil(boundingRect.bottom));
                    }
                }
            } while (parent != null);
        }
    }
再分析下去也没有什么头绪,这涉及到 Android 控件系统的刷新机制,这里先放一放等更深入理解了 Android 的空间系统再来回顾。 下面我们分析下 Scroller 的用法以及原理。
Scroller
用法
先简单定义一个 View 看一下效果,代码如下:
public class MyLinearLayout extends LinearLayout {

    Scroller mScroller;

    public MyLinearLayout(Context context) {
        super(context);

    }

    public MyLinearLayout(Context context, AttributeSet attrs) {
        super(context, attrs);
        mScroller = new Scroller(context);
    }

    @Override
    public void scrollTo(int x, int y) {
        super.scrollTo(x,y);

    }

    public void scrollToPosition(int x, int y) {
        mScroller.startScroll(0, 0, x, y, 10000);
        invalidate();
    }

    @Override
    public void computeScroll() {
        if (mScroller.computeScrollOffset()) {
            scrollTo(mScroller.getCurrX(), mScroller.getCurrY());
            invalidate();
        }
    }
}
页面上有一个按钮,点击这个按钮的时候可以看到 MyLinearLayout 里的内容满满的滑了出去。这是怎么做到的,我们先看一下官方的文档。

简单来说就是:你可以用 Scrollers(Scroller 和 OverScroller)跟踪滑动偏移,但是它们不会应用这些位置到你的 View。是你自己的职责去获取和应用坐标且使滑动动画看起来很顺畅。
在上面的例子中我们重写了 computeScroll() 方法,其中有这样一个判断:
if (mScroller.computeScrollOffset())
我们来看一下它的源码:
  /**
     * Call this when you want to know the new location.  If it returns true,
     * the animation is not yet finished.
     */
    public boolean computeScrollOffset() {
        if (mFinished) {
            return false;
        }

        int timePassed = (int)(AnimationUtils.currentAnimationTimeMillis() - mStartTime);

        if (timePassed < mDuration) {
            switch (mMode) {
            case SCROLL_MODE:
                final float x = mInterpolator.getInterpolation(timePassed * mDurationReciprocal);
                mCurrX = mStartX + Math.round(x * mDeltaX);
                mCurrY = mStartY + Math.round(x * mDeltaY);
                break;
            case FLING_MODE:
                final float t = (float) timePassed / mDuration;
                final int index = (int) (NB_SAMPLES * t);
                float distanceCoef = 1.f;
                float velocityCoef = 0.f;
                if (index < NB_SAMPLES) {
                    final float t_inf = (float) index / NB_SAMPLES;
                    final float t_sup = (float) (index + 1) / NB_SAMPLES;
                    final float d_inf = SPLINE_POSITION[index];
                    final float d_sup = SPLINE_POSITION[index + 1];
                    velocityCoef = (d_sup - d_inf) / (t_sup - t_inf);
                    distanceCoef = d_inf + (t - t_inf) * velocityCoef;
                }

                mCurrVelocity = velocityCoef * mDistance / mDuration * 1000.0f;

                mCurrX = mStartX + Math.round(distanceCoef * (mFinalX - mStartX));
                // Pin to mMinX <= mCurrX <= mMaxX
                mCurrX = Math.min(mCurrX, mMaxX);
                mCurrX = Math.max(mCurrX, mMinX);

                mCurrY = mStartY + Math.round(distanceCoef * (mFinalY - mStartY));
                // Pin to mMinY <= mCurrY <= mMaxY
                mCurrY = Math.min(mCurrY, mMaxY);
                mCurrY = Math.max(mCurrY, mMinY);

                if (mCurrX == mFinalX && mCurrY == mFinalY) {
                    mFinished = true;
                }

                break;
            }
        }
        else {
            mCurrX = mFinalX;
            mCurrY = mFinalY;
            mFinished = true;
        }
        return true;
    }
注释写的很清楚,当你想知道新的 location 的时候调用这个方法,如果动画还没结束它会返回 true。
其中有 timePassed 和 mDuration 的比较,用来判断动画有没有完成,如果没有根据动画设置的 duration 和其实坐标点计算出 mCurrX 和 mCurrY ,而在 View 中拿到 mCurrX 和 mCurrY 再去 scrollTo 这个位置。
而我们覆写的 computeScroll 会在 onDraw 里被调用。
Scroller 和 OverScroller 的区别
Scroller 从 Api 1 开始就有了,OverScroller 是 Api 19 加进来的,其中增加了对超过边界的处理,算是对 Scroller 的一种补充。